new post
Grills from Weber are undoubtedly some of the best products available on the market. Weber is known for its durability and long-lasting performance, which is why it has become a household name. Their durability makes them a good choice.
It does not mean, however, that they will not need to be cleaned and maintained correctly. Weber gas grills will last a lifetime, but they need to be maintained. To keep our grills clean and free of debris, we usually focus on cleaning the grill grates, grease tray, and firebox.
Cleaning those burners is often forgotten.
Today we will share how to clean the burner tubes of a Weber gas grill so they continue to heat the food properly.
Flame pattern defects that are common
To begin the cleaning process of your burner tubes, you must first inspect the flame patterns. An overview of defective flaming practices is provided here.
A cracked burner tube will produce an uneven and large yellow flame.
There are clogged holes in the burner tubes if there are blue-coloured flames in certain areas and no fire in others.
A clogged flow regulator or orifice on the burner is likely to result in no love.
Following are the tools and supplies you will need to clean your grill thoroughly
Grill brush
Leather grilling gloves
Narrow and wide putty knives
Stainless steel bristle brush
Eyeglass screwdriver or paper clip
Disposable latex/nitrile gloves
Windex, Simple Green or similar cleaner
Stainless steel cleaner
Compressed air duster
0000 super-fine steel wool
Towels/rags
Garbage bag
1): Brush The Grates

All burners need to be turned up to HIGH, and the grates need to be burned off for 10-15 minutes. The grates' top side should be cleaned using a grill brush. Then flip the grilling grates over and brush the backside once they are cool enough to handle safely. Grates should be removed and set aside.
2)Scrape The Flavorizer Bars

Utilizing a wide putty knife, scrape both sides of each Flavorizer bar into the grill after it has cooled sufficiently. It is essential to examine every bar. The food drippings and high temperatures that Flavorizer bars are exposed to cause the bars to rust often. It is not necessary to replace them until the rusted part of the casing wears through and breaks. Once you've scraped the Flavorizer bars, put them aside.
3): Scrape The Upper Firebox

Remove debris from the back and sides of the upper firebox by scraping it with a wide putty knife, which will allow it to fall into the grill. Sweep the ledges, nooks, crannies with a stainless steel wire brush to dust the upper firebox.
4): Clean-Out The Ignitor Boxes
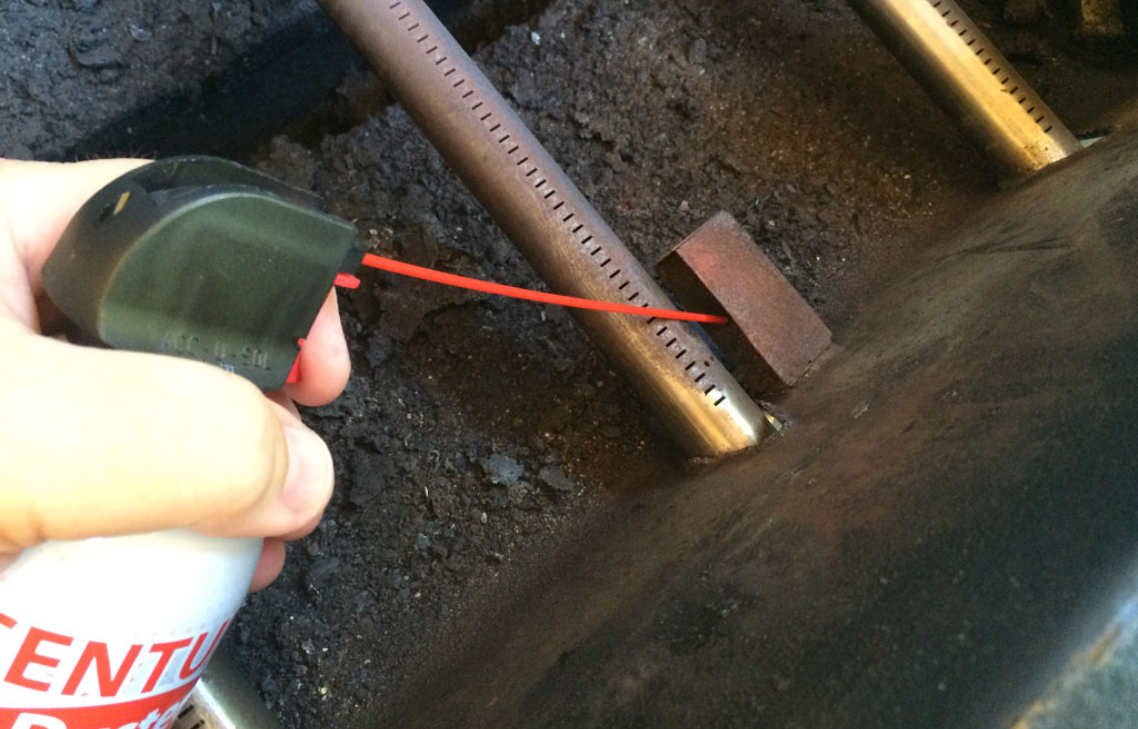
Make sure that the ignitor boxes are cleaned with a compressed air duster. The ignition assembly in each box should be replaced if rusted through. This will allow the grill to light quickly.
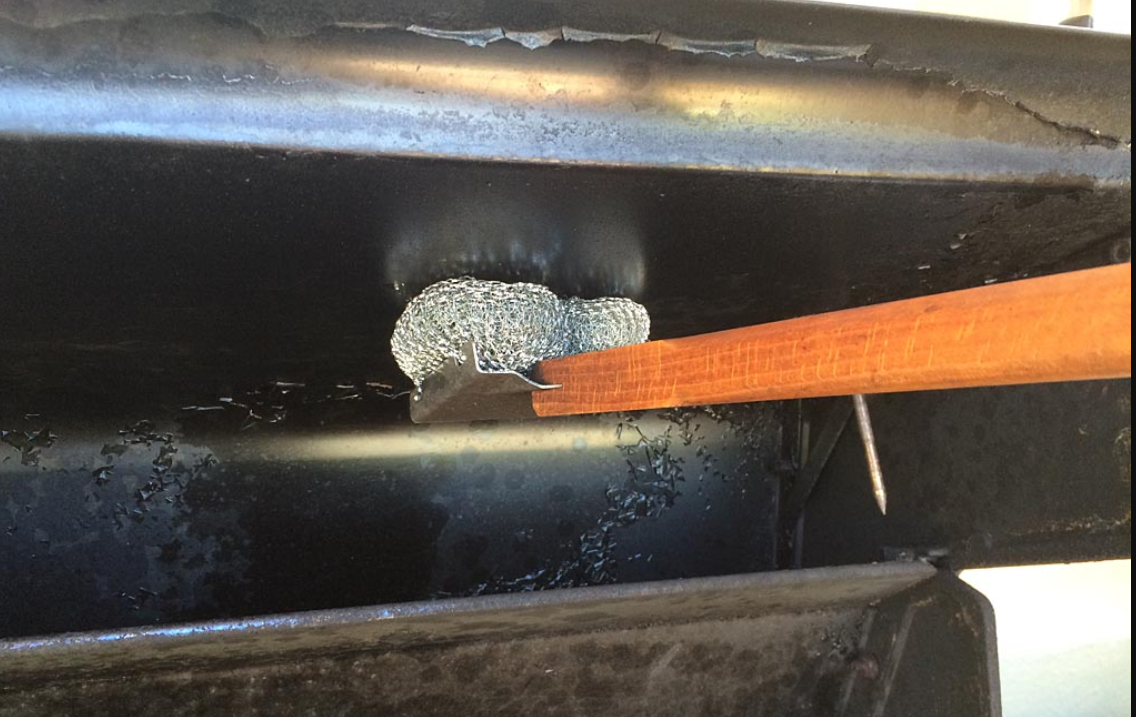
Clean The Burners & Crossover Tubes

For cleaning the burner tubes and crossover tubes, use a stainless steel wire brush. Please make sure the bristles of the brush penetrate the holes to clean them. Be particularly careful about the holes leading from the ignitor box to the burner's top as well as the hole leading to the Burner's Crossover tube. When these holes are blocked, it's hard to light the grill and the secondary burners.
Even if you brush the top of the burner, a few holes are likely to remain clogged. Using an eyeglass screwdriver or paper clip, punch down on the debris to remove it.
Scrape The Lower Firebox
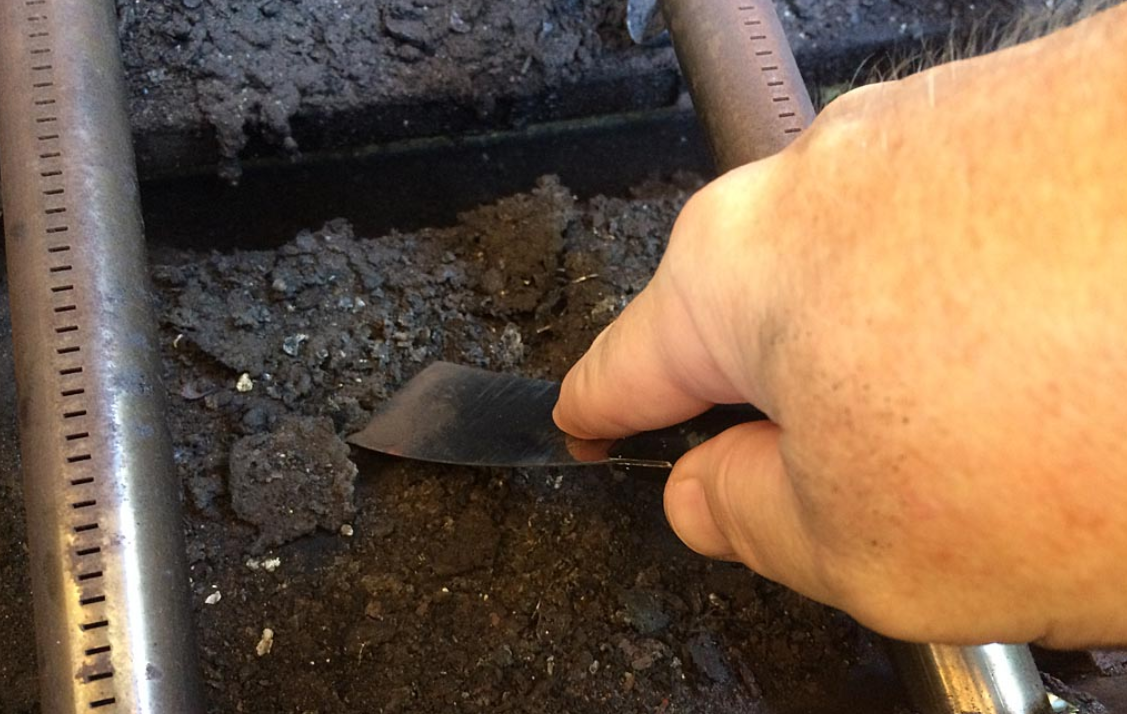
The lower firebox below the burner tubes should be scraped with a narrow putty knife. Remove the debris from the grill and place it in the bottom tray. Dust with a compressed air duster if there is any debris that can't be reached.
Brush Inside The Lid
Remove any flaking material inside the grill lid with a grill brush or aluminum foil wad. The flakes are made up of carbonized grease that builds up during grilling and eventually falls off. Neither rust nor paint is corroding.
Reinstall The Flavorizer Bars & Cooking Grates

The Flavorizer bars and cooking grates can be reinstalled inside the firebox now that everything has been cleaned. The Flavorizer bars may need to be reinstalled in a different order, so they wear out more evenly. Swapping the edge bars for the centre bars might do the trick.
Clean The Bottom Tray & Drip Pan

Each grill model has a different bottom tray shape and size. The one shown here is a narrow one covered with porcelain enamel. Stainless steel is sometimes used. A bottom tray serves as the entire bottom of the grill box on older models like Genesis 1000. This is to emphasize that your bottom tray may not look exactly like the one shown here.
The bottom tray needs to be removed from the grill. Using a putty knife, scrape the tray contents into a trash bag, then wipe away any remaining grease with paper towels. You should discard any oil that was not contained by the foil drip pan liner, and you should discard the foil drip pan liner. Wipe off any fat and debris with paper towels after removing the drip pan brackets.
Before Reassembly
The assembly process begins once everything has been finished, including the finishing touch. Hold on a moment. Achieving our goal is almost here. The gas line should be connected to your burner, and the flame should be operating correctly. Then, cook plates and grates can be attached.
Additionally, turn the grill off later and replace the residing parts. If you see too many yellowish flames or what appears to be zero flames, you will need to do some adjusting.
Adjust the air setting and then try to transfer it. On the grill burner, this is available. For a flame to work, there must be an infallible blend of oxygen and gas. A lovely blue flame will appear once it's good!
FAQ-how to clean Weber gas grill burner tubes
How do you clean gas burner tubes?
Cleaning the burner tube with a small diameter bottle brush or a burner cleaning rod is best to remove debris. By blocking the pores, the propane cannot move through them, so your food cannot be adequately heated or cooked. To remove food debris and dirt from the burners, scrub the outside with a nylon brush.
How do you clean the orifice on a gas grill?
It is possible to clean them out with a wooden toothpick, a cotton swab or, more often, an air blast. When replacing orifices, do not use nails, knives, or other sharp metal objects to alter the orifice size or damage it. After returning the orifices, clean out the venturi tubes and then reinstall them over the orifices.
How long should gas grills last?
American grills are typically thrown out after just three years. In any case, we guarantee that they will last much longer! Realistically, gas grills last from five to fifteen years before they require replacement. A grill's lifespan is determined by the level of care it receives.
How do you clean a clogged propane regulator?
A propane regulator becomes clogged. How do you clean it? To make your dish soap, mix 1/4 cup sodium bicarbonate and water in a bowl. In a solution, both components should be equally present. Ensure the hose is connected again, and all connections are brushed with the answer.
What is the best way to clean cast iron grill grates?
You should burn any food left behind on cast iron grates when cleaning them. You can now scrub the grates with a nylon brush once they have cooled. The grates should be cleaned and dried at this point and then sprayed with vegetable oil to prevent rust.
Conclusion
There you go, everyone! This article contains all the details on how to clean Weber gas grill burner tubes. The only thing you need to do now is follow these steps. You should not ignore the benefits of deep tube cleaning just because you're lazy.
You might be able to save the gas grill as a whole. Grills from Weber can be pretty expensive. The fault is on you if your equipment is lost due to neglecting maintenance. Keep clean-up rituals coming, and make sure to do so now and then. I wish you the best of luck!
Comments
Post a Comment